A friend of mine had a birthday last week and we celebrated with her Saturday night. I tried my hand at a scrabble tile pendant for her. There were several mistakes along the way but I like how this cam out. I cut out a seahorse motif from Webster's 6x6 papers (these were from late 2010 or early 2011 I think??) and mounted them on a square from the opposite side. Afetr gluing it to the tile, I inked the edges and used gelly roll stardust pens on both horses. Finished it off with diamond glaze and a bail- I purposely left in air bubbles to mimic underwater.
I was concerned with how much time the diamond glaze had had to cure and wanted a box to keep it from getting hit. I ate a cow swiss cheese and suddenly had the epiphany to use the box. A little MME paper and ink for all the circular areas and washi tapes (Dear Lizzy and Amy Tan) on the sides and I had a cute gift box :)
Sunday, January 22, 2012
Monday, January 16, 2012
Echo Park - What's so Merry?
This is the other LO I got done at Archivers last week. I wish I could remember what R was so annoyed about but he this face is so funny- esp since it was Christmas morning :D
Supplies: EP paper, Bazzill CS, CC Tiny Type, AC Thickers, Prima flower, Imaginisce brad, Jillybean labels. Long border strips unknown
Thursday, January 12, 2012
MME Love Me
I finally got to go to Archiver's last week and actually scrapbooked!! I did not get a lot done but had so much fun. I had reserved tables for 8 of us and then a few more friends had a table in the other room. It was also my birthday and I feel so spoiled and loved by my friends who brought me cake, balloons and flowers. What could be better than a scrapbooking birthday "party" with good girl friends?? :)
Anyway, I had a lot of fun playing with the MME Love Me line and an old, old pic of my husband and I from when we were newly engaged. The pic was taken by someone else and hung on my cubicle wall for a while so is not that great. But, I love it nonetheless and my friend scanned it for me so I can maybe tweak it later and re-print. The LO pic is not that great either but I have given up on ever seeing the sun again :P Damp, rainy, windy, and cold are the order of the week.
Supplies: MME Love Me paper and Die-cuts, Archivers CS, Martha Stewart paper tape, AC Knock Out punch, Sakura Micron pen, OA Sprinklers, SC Mr Hueys, KI Memories tape, QQ Ink
Anyway, I had a lot of fun playing with the MME Love Me line and an old, old pic of my husband and I from when we were newly engaged. The pic was taken by someone else and hung on my cubicle wall for a while so is not that great. But, I love it nonetheless and my friend scanned it for me so I can maybe tweak it later and re-print. The LO pic is not that great either but I have given up on ever seeing the sun again :P Damp, rainy, windy, and cold are the order of the week.
Supplies: MME Love Me paper and Die-cuts, Archivers CS, Martha Stewart paper tape, AC Knock Out punch, Sakura Micron pen, OA Sprinklers, SC Mr Hueys, KI Memories tape, QQ Ink
Tuesday, January 3, 2012
Internet Implemented - Mercury Glass Ornaments
This was another crafty something I did over the holidays. While looking at all the DIY glass ornament tutorials, I searched for some using alcohol inks because I don't have many regular reinkers but I have a gajillion alcohol inks from the days of making my own "skittles" (remember those??)
I found this Ranger tutorial that looked super easy. Turns out Mr Holtz just tends to make things look that way. I found it needed a little practice; but, the results are super pretty and it is quick and fun - not to mention inexpensive enough that I didn't mind experimenting :P All it takes is some plain glass ornaments, alcohol ink, metallic mixative, and compressed air (which we have 6 cans of for some odd reason). The end result is a multi-colored glass ornament with some opaqueness from the metallic mixative (which gives that mercury glass appearance). Lots of fun. I gave one to each couple in my family but did not keep one for myself (need to make another) so this is the only pic I have. If you clcik on the pic, you can actually see a second ornament that blogger is cutting off
Monday, January 2, 2012
Internet Implemented - Christmas Card Display
So, my poor blog is dusty again. It's been that kind of year :P I have barely done anything scrappy in months- just my Christmas cards and 2 mini-books I made for my nieces that I didn't even photograph before the gifting occurred plus the 1 LO posted below. Oh well. New Year, new scrapping commitment I hope :) I am scheduled to go to Archiver's on Friday so that will hopefully help. But, I did want to post this slightly crafty project because it was a super-easy to make card Christmas card display that cost maybe $5 (if that) I had the ribbon and the angel ornament as well as a glue gun in my stash. I bought decorative ornament hooks on clearance last year at Target (but the hooks like those of the Clip-it-up would work) and the dowel was a buck or 2 at home depot and cut by my husband for just "thank yous"
Anyway, I just had him cut the dowels in incrementally smaller lengths (6,8, 10, 12 and 14") and hot glued them between a folded up length of ribbon. Added the angel and a hanger to the top and I was done. The one I saw on the internet last year (wish I could remember where so I could give credit) did a better job of arranging the cards to look more tree like but I still like how mine looked and I really enjoyed having all the cards visible instead of lumped in a basket together.
Wednesday, November 9, 2011
SPCS - Try it Thursday
I did this LO for the SPCS Try it Thursday challenge which was to use patterned paper as your LO background. I ended up suing 4 6x6 papers and then I hand-sewed in-between them. Crazy talk for me :P
Anyway, this is the only pic I had from a rather memorable - and crappy - day a couple summers ago. So, despite the picture of my 2 friends being terrible, I decided to use it any way. The long story of my horrible day will go on a tag in the MR envelope. I also went out of my way to use some older stash items.
Supplies: Bazzill CS, Authentique PPs, Fancy Pants Rub-ons, Marcella by Kay epoxy letters, MM glitter alphas, Prima and Artsylicious flowers, Artsylicious and Recollections buttons, MR envelope, MM journaling note, Colorbox ink, Embroidery floss
Anyway, this is the only pic I had from a rather memorable - and crappy - day a couple summers ago. So, despite the picture of my 2 friends being terrible, I decided to use it any way. The long story of my horrible day will go on a tag in the MR envelope. I also went out of my way to use some older stash items.
Supplies: Bazzill CS, Authentique PPs, Fancy Pants Rub-ons, Marcella by Kay epoxy letters, MM glitter alphas, Prima and Artsylicious flowers, Artsylicious and Recollections buttons, MR envelope, MM journaling note, Colorbox ink, Embroidery floss
Sunday, November 6, 2011
SPCS: SEI Corinne
I have not had an easy couple years. While I am blessed with an amazing family and we moved into a new house in that time-frame, I have dealt with several major illnesses in my immediate family, lost my grandfather, lost a job I loved (the company went under), etc. So, I know I have shared a whole lot of angst with my friends. As much as I try not to be a Debbie Downer, sometimes I've just needed a shoulder to cry on. Luckily, I am incredibly blessed in the friend department- including the one on this LO. She is always there for me and the title and journaling is about that.
I used the Sept SPCS Juicy kit. The papers were mostly SEI Corinne, Honestly, I didn't think I liked the line that much; but, they turned out to be way better in person. pics don't do justice. I fussy-cut the PP and really love the resulting LO
Supplies: SEI PP and Epoxy stickers; Prima letters; CC Tiny Type; AC Thickers & tape; MS punches; Hambly washi tape; bazzill CS, OA Sprinklers
I used the Sept SPCS Juicy kit. The papers were mostly SEI Corinne, Honestly, I didn't think I liked the line that much; but, they turned out to be way better in person. pics don't do justice. I fussy-cut the PP and really love the resulting LO
Supplies: SEI PP and Epoxy stickers; Prima letters; CC Tiny Type; AC Thickers & tape; MS punches; Hambly washi tape; bazzill CS, OA Sprinklers
Saturday, November 5, 2011
Origins
My much-talented friend Brie made a gorgeous quilt for my equally talented friend Erin for her new baby. Since we are all scrappy, Brie thoughtfully made it from BG Origins fabric. So, I just had to scrapbook this pic with the Origins line. I think I salvaged the LO but I really did not like how it was going at first. It's not my fav but I like it okay now and I love the girlfriends :)
Supplies: BG paper, rub-ons, woolies, take notes; AC Thickers; CC tiny type
Friday, November 4, 2011
Holiday Cards
Feel free not to look if you get cards from me. I don't normally post cards before I send them but I just can't help myself cause I am so pleased with how they came out (for once - I'm not much of a card maker). Plus they are relatively simple to make en masse

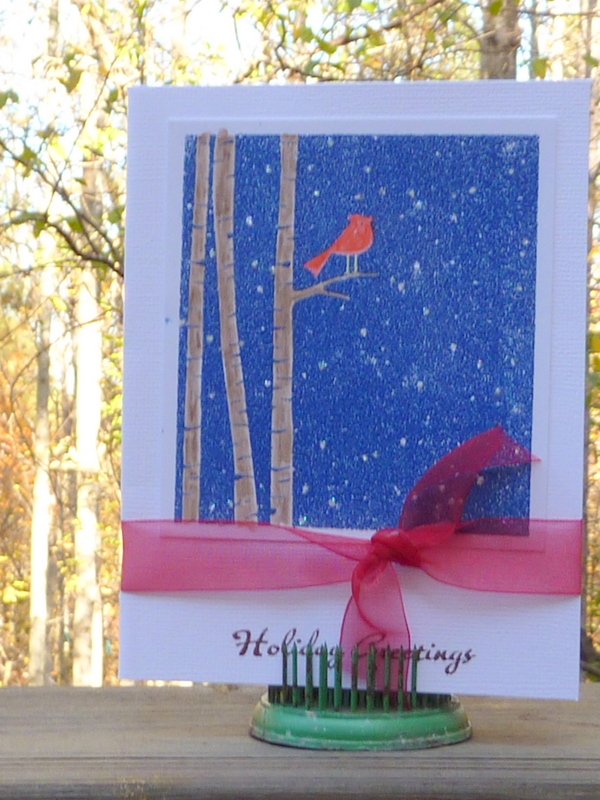
The first one is a more generic holiday card. The stamp is from Hero Arts (new this year) and was embossed with Versamark and AC Zing blue embossing powder. I then colored in the bird and tree trunks with prisma-color watercolor pencils and a blender pen and put stickles on all the snowflakes (or stars) in the sky Sentiment is from a clear acrylic set from Making Memories (maybe Fa-La-La?). The card bases are pre-made/folded cards from DCWV. Ribbon is from Michaels.
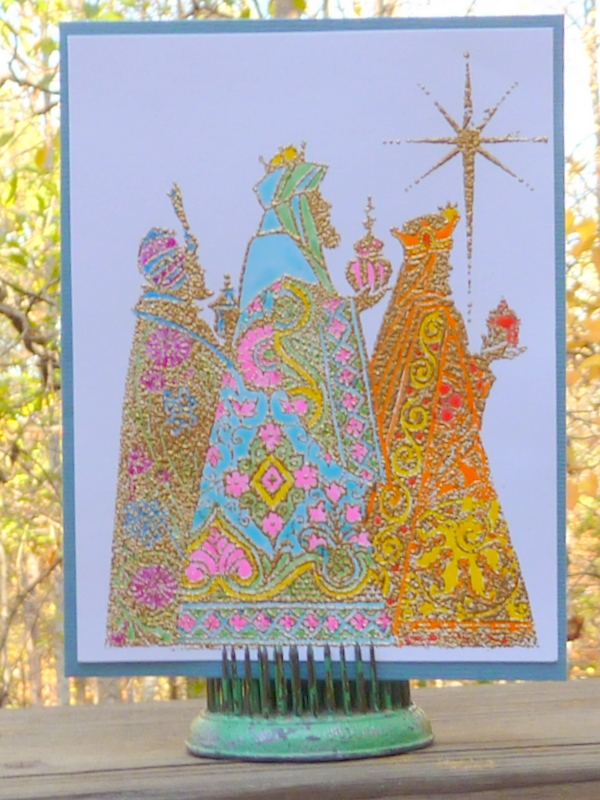
The second card is also embossed - this time with Versamark and Gold embossing powder from Ranger. The stamp is from Stampendous and I love it!!!! Card bases are also DCWV pre-fabs. Sentiment on the inside is from Inkadinkadoo and says "Wise Men Still Seek Him". I am in the process of coloring in all the cards with Sakura Glaze pens. The pics do not do them justice- the glaze pens with the embossing looks like Cloisonne :) Obviously, the coloring on these is time consuming but they look beautitul just embossed wih gold and are much easier to make en masse that way :)
The first one is a more generic holiday card. The stamp is from Hero Arts (new this year) and was embossed with Versamark and AC Zing blue embossing powder. I then colored in the bird and tree trunks with prisma-color watercolor pencils and a blender pen and put stickles on all the snowflakes (or stars) in the sky Sentiment is from a clear acrylic set from Making Memories (maybe Fa-La-La?). The card bases are pre-made/folded cards from DCWV. Ribbon is from Michaels.
The second card is also embossed - this time with Versamark and Gold embossing powder from Ranger. The stamp is from Stampendous and I love it!!!! Card bases are also DCWV pre-fabs. Sentiment on the inside is from Inkadinkadoo and says "Wise Men Still Seek Him". I am in the process of coloring in all the cards with Sakura Glaze pens. The pics do not do them justice- the glaze pens with the embossing looks like Cloisonne :) Obviously, the coloring on these is time consuming but they look beautitul just embossed wih gold and are much easier to make en masse that way :)
Thursday, November 3, 2011
Bloom
I did this LO at Archivers a while back. I had a gorgeous kit from Sweet Peach Crop shop (August) and I decided it would be fun to do a page with my boys with what is stereotypically a girl color- pink. I'm actually super happy with how it came out.
Supplies: TA glimmer mist, AC Thickers, Sassafras fold-it(?) flowers & die-cut sticker, Kaisercraft pearls, Authentique PP & die-cutss, Bazzill CS
Subscribe to:
Posts (Atom)