Thursday, February 24, 2011
Sketch Mania #30 - Sympathy Card
A dear scrappy friend and her husband lost his father last week; so, I was in need of a sympathy card and made this while scrapbooking Friday night. I used Sketch Mania's #30 as a springboard for this design. Disclaimer: I am not a card-maker so my cards tend to be super-simple.
Anyway, this one layer card is on a DCWV card base and has a strip of brown CS lining the bottom border. Strips of SEI Poppy paper inked with Colorbox chalk ink are the focal point (I thought that esp appropriate since poppies are for remembrance). Sentiments on inside and out are written with a zig marker. The sentiment on the inside is Revelations 21:4 which is approx this (translations vary obviously): "He will wipe away every tear from their eyes, and death shall be no more, neither shall there be mourning, nor crying, nor pain anymore, for the former things have passed away."
DIY Resin Embellishments - flowers, birds, stars oh my!
I happen to love all the resin roses and mums that have been appearing in several manufacturers' collections; but, I don't always like the available colors or the price tags. So, I googled and found this video tutorial for making your own. Through the description, I found the link to Betsy Veldman's blog post about making these which led me to this etsy shop where I promptly ordered several molds. They arrived just a few days later and I finally made it to Michaels to buy Easy Cast clear casting resin. These are my initial sets.
They do take a long time to cure- probably 8-12 hours to be hard enough to pop out of the mold and up to 72 hours to reach "hard cure" status. I colored the first set (the hot pink mums and roses) with luminarte twinkling H2Os (had to add a little water first) but all others were colored with perfect pearls or perfect pearls and chalk mixes. They are so easy- and fun - to make. Not sure they are "frugal" given the initial investment but I like having more color/shape/size options and I already owned the items I am using to color the resin at least.
Wednesday, February 23, 2011
Sketchy Thursday - 2.17 Challenge
This layout is doing double duty - I used the latest Sketchy Thursday sketch for it and it is for the latest "Chocolatier" challenge at cropchocolate.com which was to do a travel or vacation layout with CC product.
The base is Paper Company CS (Archiver's). All papers are "Walk in the Park" from Echo Park as are the smaller title letter stickers. Buttons, embroidery thread, and tickets are from my stash (tickets are from the actual carnival and another event). Chipboard letters are plain AC Thickers that were painted with a Jenni Bowlin dauber. I sanded the edges of the focal photo and popped it up and inked the edges of the other 2 photos (stazon). Other tools- fiskars decorative circle punch, CM corner rounder, fiskars threading water punch, fiskars creativeworks butterfly punch , sakura micron pen, smooch spritz.
Tuesday, February 22, 2011
Sweet Peach Crop Shop - February Sketch
This Layout was done based on the February sketch over at Sweet Peach Crop Shop and was mostly done with their February Juicy kit which is now sold out. I can understand why because it was awesome- even for someone not big on Valentine's celebrations. These pics are of my cousin-in-law. The CS is bazzill dotted swiss, the ribbon from Hobby Lobby- both from my stash. The patterned papers are Jenny Bowlin and Cosmo Cricket; flowers Maya Road; rub-on title from Glitz Designs; red heart lace from the kit. I also used 2 label strips from the kit's MME papers as the borders directly under the photos (they put designs on half the strip)
Monday, February 21, 2011
Sketch Mania #32
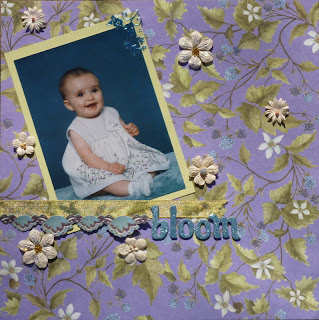
This is a photo of my niece when she was a baby. With 2 boys, I love the excuse to do a girl page once in a while- esp with girls I love as much as my 2 nieces :)
The paper is new K&Co (Thanks, J, for sharing a piece with me) and has beautiful foil accents on it. Mat is CS from archiver's; title is AC Thickers; flowers are prima with some stickles added; ribbon is May Arts.
I used to make LOs with tilted photos all the time and have not in quite a while so this fun sketch was a good catalyst to re-visit that technique :)Updated: Since taking the original pic, I added a small adhesive border at the bottom of the ribbon and a foil accent to the top right corner of the photo (both from matching K&Co embellie packs). I am an adder sometimes- esp after a shopping trip to Joann's *LOL* So, here is a new picture of the layout
Sunday, February 20, 2011
Sketch Mania #31
Here is my take on Sketch Mania's sketch #31. The papers are from my stash- where they have resided for years and years *LOL* I wish a photo could capture it but the swirl is actually silver metallic cardstock that looks like a mirror. The reason it looks blue is because that was the colorof the sky when I took this photo (and you can see a branch reflected in the top and just the edge of my camera and hand in the right corner). The Title letters are AC Thickers and my hand-writing done with a black sharpie. The pictures are from the house of mirrors at a small parking lot carnival during the summer '09. The boys were totally fascinated by the whole experience :) TFL
The title is a paraphrase of the lyrics of "His Love Makes Me Beautiful" from "Funny Girl"
Saturday, February 19, 2011
Sketch Mania #29
I found a relatively new sketch site Sketch Mania while looking around the comments at cropchocolate.com last week. I printed out all 4 of this month's sketches to play with when I finally had time to scrapbook last night. Here is the first one. All product is WRMK Nonsense except the buttons from Hobby lobby, Colorbox cats eye ink and brown CS from Archiver's (Bazzill Basics) I inked the edges of all the matching embellies and popped them up for more dimension. I love this photo and really wanted papers that conveyed both joy and motion :)
Updated: I felt like the original LO was missing something and was not as balanced as I would like. So, I added the chipboard title on the left side and am much happier. Pardon the slight crookedness- After several photography attempts, I satisfied myself with crooked but well-lit :P
Thursday, February 17, 2011
Sweet Peach Crop Shop - Try It Thursday
This week's challenge over at Sweet Peach Crop shop was to make a monochromatic layout with just a pop of another color. Not sure how well this accomplished the task- seems like maybe more than a pop- but it was my attempt nonetheless. I also was wanting to try out all my MS border and around the page punches again- I have had them for ages and never really used them much. I think I might be in love. So, really simple page- just a fancy photo mat on top of another mat to make it show, lots of layered borders, a little tab sticker, and a chipboard piece. Everything is BG Marjolaine except the fancy photo mat which is Heidi Grace.
Wednesday, February 16, 2011
Sketchy Thursday - 2.10 Challenge
Did another fun sketch challenge from Sketchy Thursdays this week. I did not think I would have time to try it; but, so glad I managed it because I really liked how it came out and enjoyed the process. The sketch and my LO are to the right.
For my LO, I used Paper Company white cardstock from Archiver's (house brand); KI Memories patterned papers (Probably Pop Culture line); AC Thickers in black foam; Martha Stewart corner and borer punches; My Creative Memories corner rounder; Sakura Micron black pen (I have had it for 10+ years and it still writes great); ColorBox black pigment cats eye; MM brads; black Stazon (swiped on edges of focal photo); ribbon from Michael's $1 bin.
I had to re-take my photo of the LO due to technical issues and lost the sun so you can't see the shadows as well- the main photo is popped up and the layered mats and borders give it a nice texture IRL. TFL :)
Monday, February 14, 2011
Tutorial: Using Picasa to create photo collages
Today, I want to discuss one of my favorite features of Picasa- the free photo software from google. It can be downloaded here: http://picasa.google.com/ It walks you through the install pretty seamlessly and, when you open it, it will go find all your photos if you let it. The photo-editing is pretty feature rich and is, to me at least, a lot more intuitive than Photoshop which I have never had the energy to learn. And did I mention it's free? :P You can use Picasa for tagging, adding captions via meta-data, cataloging (via face recognition, physical location or tags), editing (of course), and even uploading to picasaweb albums to any number of photo printing sites like shutterfly. I love that last feature a lot just because it manages any transmittal failures and re-tries for me. I no longer come back to find errors on my shutterfly uploads and needing to re-send.
But, what I really want to talk about today is creating photo collages. I know I am not the only one who sometimes wants to print 2 (or even 4) photos on one 4x6 print. Or sometimes, I want to throw 10 photos on an 8x10. Lots of photo shopping sites will allow you to create collages but they then charge you way more for that print than a normal 4x6, 5x7, or 8x10 would cost. And sometimes we want to print immediately on our handy-dandy personal printers so being able to create a collage as one file ourselves would be oh so nice, right? So, here is how (assuming picasa has been installed and pictures have already been imported) BTW: Any SS below can be viewed larger by clicking on it or you can right-click and hit open in new tab/window
In this first SS, I am viewing one library (i.e. a folder on my computer) In the bottom toolbar, I have circled what looks like a push-pin. You can press that button to "hold" or select a photo while you scroll thru all the photos in your library. I used that push-pin to select 5 photos of my kids on the swingset.
Next, also in the bottom toolbar, is a button that says Collage. You can press that- or you can go to the top menu and hit Create -> Collage
At this point, the collage editing screen should open up with a starter collage. There are several options to be explored on the collage tab. The first, shown below, is the type of collage. You can choose a picture pile (kinda like 662 card pickup for photos); A grid format which works best with perfect square numbers of photos (i.e. 4, 9, 16, 25, etc) to avoid repeats; a grid surrounding one central photo; and the one I most commonly choose - Mosaic - which tries to simply fit your photos to the photo. I ind this one esp useful when using both portrait and landscape photos.
On the bottom, there is also a button to shuffle which will just keep regenerating the same mosaic with photos moved around within it.
Now that I have selected my collage type, you can see the other options on the collage sidebar. You can change the grid-spacing (as seen in the right pane). You can select another color (besides white) or even an image to fill in the background between the pics. You can select photo size/format (i.e. 4x6, 8x10, screen-saver, or cd cover). If you want to print on your own photo printer or upload to a photo-site for printing, you should definitely select a standard photo size. You can also change the orientation of the collage between landscape (horizontal) or portrait (vertical)
A view of the collage-size menu
And now my collage after changing to a portrait orientation
At this point, I decided that I wanted the picture in the bottom right corner to be bigger and in the bottom left spot. So, I simply clicked on the picture and dragged it the desired spot. The photo that was there got swapped to the smaller right-corner
You can also press the View and Edit button (or right click the photo and select that option) to edit that particular photo (maybe crop or lighten). When you save any changes, it will update the collage and bring you back to the collage screen. You can also remove a photo from the collage by right-clicking and selecting delete.
When you have the collage looking the way you want, simply save it and then you will be ready to upload and print!! I hope this helps; but, if you need clarification or help, feel free to comment and I will be happy to answer any questions :)
Saturday, February 12, 2011
Sweet Peach Crop Shop - Family pic
Here is another LO I did last weekend. I used SPCS's February kit (G45 Springtime papers, tag; lace ribbon) plus some die-cut butterflies (I think from a cuttlebug die?) that a friend gave me (K&Company papers) and some Kaiser Craft pearls.
I cut the center out of the base paper with a craft knife before attaching the green butterfly paper which I had torn and inked with Colorbox chalk cats eyes in both a brown and a mauve. Then I tore and inked the center piece I had saved. I matted our family photo on brown CS before matting it on the flower/butterfly mat and then the background. Then I added the tag and butterflies. I used the KC bling to add definition to the butterfly body and also inked the edges of the wings. Journaling was done with my oh-so-popular brown Zig pen
I haven't made it back into my craft cave in a few days- bummer - but hopefully can get in there soon :)
Wednesday, February 9, 2011
Sweet Peach Crop Shop: Try it Thursday - Quilting
I've been meaning to join in on the Try it Thursday fun over at Sweet Peach Crop shop's blog; but, I always lose track of the time. But, I finally did it this time! Now, this is not strictly quilted- there is no sewing here - not even faux. But, I think the squares of paper mixed with photos still manage that patchwork quilt look. I love all the bright and happy paper squares mixed with the fun photos which were taken at the same birthday party and playground as my LOs from last week.
Anyway, I used SEI Happy Birthday papers along with a couple of the matching die-cuts, AC Thickers, KI word tiles that have been in my stash for a looooooooong time, MM brad, eyelet outlet eyelet and Uniball Signo white gel pen as well as random CS from my stash (probably Archivers)
Sketchy Thursdays - Little Bunny Bunting
I did this LO for the latest challenge at Sketchy Thursdays - which a good friend recently introduced me to. I don't normally print a lot of smaller photos and I was too time constrained (had nothing to do with lazy :P ) to find and print some. So, I dug deep and pulled out these 11 year old photos of my niece. And then I challenged myself to use something relatively ancient from my stash.
These Making Memories Garden Party papers and embellies are not as old as Nic but they are from a few years ago. I followed the sketch pretty closely this time. Papers, paper flowers, and dimensional glitter stickers are all MM. Canvas button is from Prima- love how it has a little bunny on it :) Title is AC Thickers. Tools used: CM corner rounder, Martha Stewart border punch, Zig Brown pen. Journaling talks about how I love the horrified expression on Nic's face in the first photo cause it was so funny.- but only because she cheered up pretty quickly.
Tuesday, February 8, 2011
Handsome - Inspired Blueprints sketch #65
I barely started this LO Friday night while scrapbooking with a friend. Afterwards, I realized that I had subconsciously "chosen" the latest Sketch #65 from Inspired Blueprints (I only had photo and main transparency down on paper). Anyhow, last night I decided to work on the LO and this is how it came out. I decided to play with a monochromatic design to play up the pop of blue in the photo from my son's vest. I also wanted to play up the textures in my sons' vests so I mixed a lot of different kinds of flowers plus added the ruffled ribbon. I am pretty happy with the LO overall.
Materials: Bazzill bling CS, AC Thickers, Portofino ribbon, Prima flowers, Hambly transparencies, Creating Keepsakes brads, vintage buttons, embroidery thread (prob DMC). and sharpie amrker
Thursday, February 3, 2011
Playground Fun
This 2 page spread was also done with the SEI Birthday paper line (both PPs) as well as Bazzill Swiss Dot CS, Prima flowers, Deja Views brads, BG ribbon, and MM staples plus the oh so popular Thickers and Uniball signo white pen. The pics are from the same birthday party as the previous post's layout. The party was at JJ Biello park's Valley Playground which is the largest in the state and waaaaay cool. The kids were way more interested in the playground's offerings than party-related activities. So, I have way more "regular" than "birthday" photos :)
Wednesday, February 2, 2011
Birthday Fun
Here is a layout I did pretty simply. I used an EK success border punch, SEI Happy Birthday paper (collection pack), Paper Company white CS (from Archivers), a brown Zig pen, and pop dots. That's it. Candles and cupcakes were cut from some of the SEI PPs and attached with pop dots. Simple but bright and fun with a lot of photos :)
Subscribe to:
Posts (Atom)